Many believe ECDIS has changed the way we navigate our ships. Rightly so, after all we see our ship all the times on the chart. No more worries of plotting the ship’s position manually and no chances of human error in plotting the positions on paper chart.
But there are many of us, who do not still agree with this. They argue that shrinking the width and height of paper chart to a 21 inch screen can bring too many confusions. They also argue that ECDIS should not be primary means of navigation till the time all ambiguities are eliminated and procedures streamlined.
Which side do you see yourself ?

In this post I am trying to streamline some of the procedures related to ECDIS.
I strongly believe that if we deal with the ECDIS with correct approach, it would not be that difficult as it might look, specially to the seafarers working with the ECDIS for the first time.
The correct approach is comparison with the paper chart. After all that is what ECDIS is replacing. I believe if everyone deal with ECDIS with that approach, it will just be a cake walk.
So What all things we can do on paper charts? If we know how to do each of this on ECDIS, we know most about ECDIS.
- We order the paper charts for the voyage
- We keep the charts corrected upto latest notices to mariners.
- We apply any navigational warnings received during the voyage
- We draw course to plan our voyage
Do you know how to do all this on ECDIS and with ENCs ? If yes, you can consider yourself trained in the practical use of ECDIS. But as the ECDIS is still evolving, you should keep your arms open for new updates and not be complacent.
In this post I will be discussing how to order ENC (Electronic charts) and also how to correct ENCs on ECDIS.
There are hundreds of makers for ECDIS, each having different procedures, menu and layouts. However the basics of the operations are same with all of these. I will demonstrate using JRC ECDIS and Chartco but the basic procedures will be same for other makes of ECDIS.
Ordering charts (Cells) for ECDIS
In ECDIS the charts are called ENCs or cells and the charts number as cell number. In paper chart we receive charts, in ECDIS we receive cell permit. It is important to note that there is no co-relation between chart number and cell permit. I mean the boundaries or the area covered in paper chart do not necessarily correspond to a particular cell number or ENC.
I am sure almost all ships use some of the chart management system. These have become a kind of norms nowdays. The most common chart management system are ChartCo and Digitrace. I will use chartco and JRC ECDIS to discuss the cell ordering procedure and chart corrections for ECDIS.
Ordering cell permit is a four step process which involve
- Creating and exporting an order list of required cell permit
- Sending the request to chart provider
- Receiving the cell permit and
- Importing cell permit
Creating and exporting an order list
If you have been working with chartco for ordering/managing your paper charts folios, you would most likely know how to do this for ENCs.
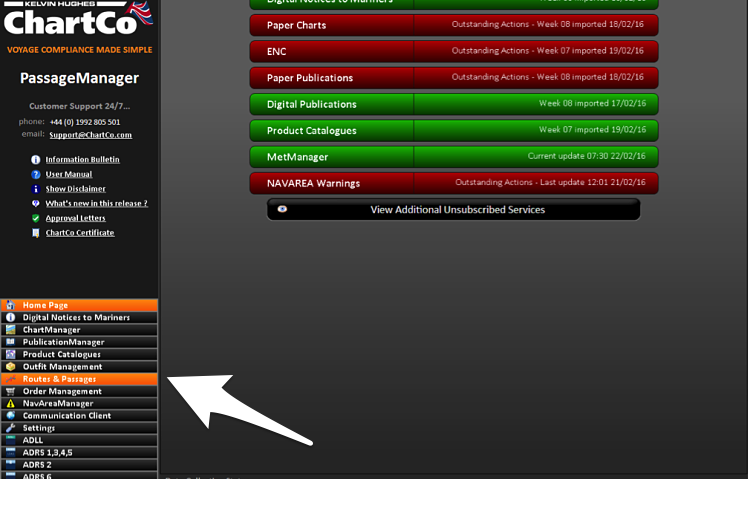
Let’s say you are at Al-Jubail in Saudi and next voyage is to Mumbai (India). How to know what all charts you have and what all you need to order. To do this in the chartco, go to Start-Main Menu and click on Route and Passage.
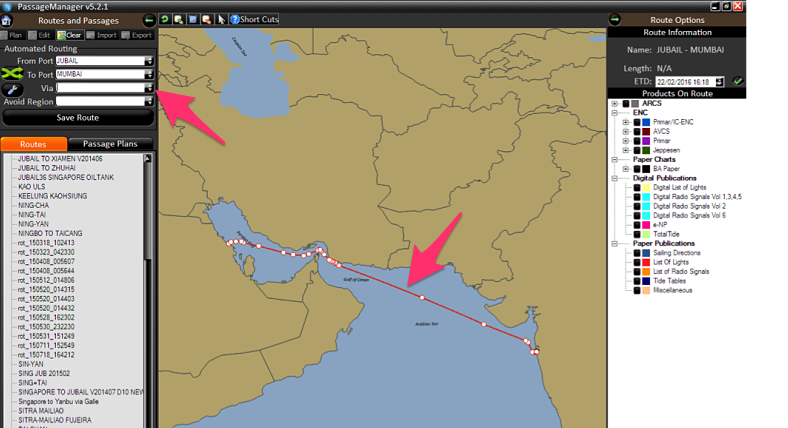
 Enter your departure port and Destination ports and click on calculate Route/Distance. This would give you the route from departure port to your destination.
Now on the right hand column, under ENC/AVCS, check all type of charts one by one starting from Berthing, harbour and so on.
Just in case you don’t know, charts on ECDIS are divided into five categories depending upon the scales. These categories are Berthing, Harbor, Coastal, General and overview.
After checking each category, select the charts required in that category and which falls in your voyage. The chart can be selected by clicking on the chart area in the map. The selected chart will have yellow diagonal lines.
But Why do i ask to start with berthing cells first. There is a reason for that. Below is the Image in which I have checked berthing, harbor and coastal charts at once. In the picture below can you guess how many charts I have selected ?
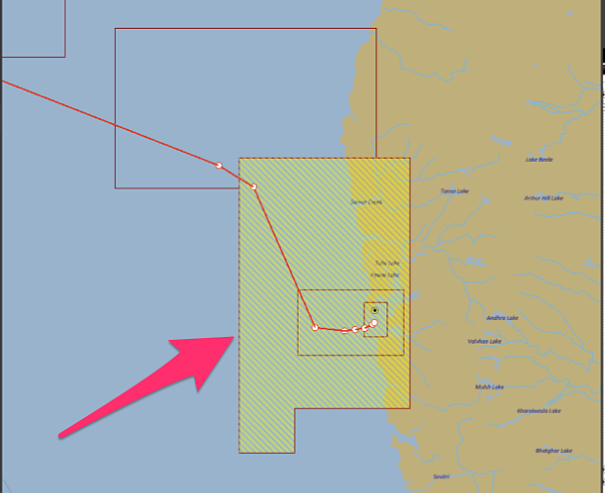
Well while it might look like I have selected three charts but actually I have only selected one chart. The one covering bigger area. So if you don’t select first the berthing and then harbour charts in that order, there is a chance of you missing some charts.
Once you have selected the required charts, Click on the “Add selected charts to the basket” at bottom right corner.
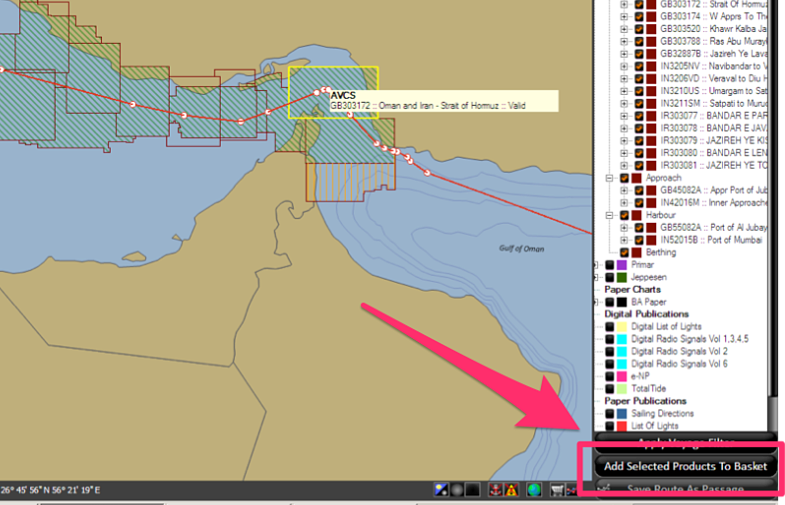
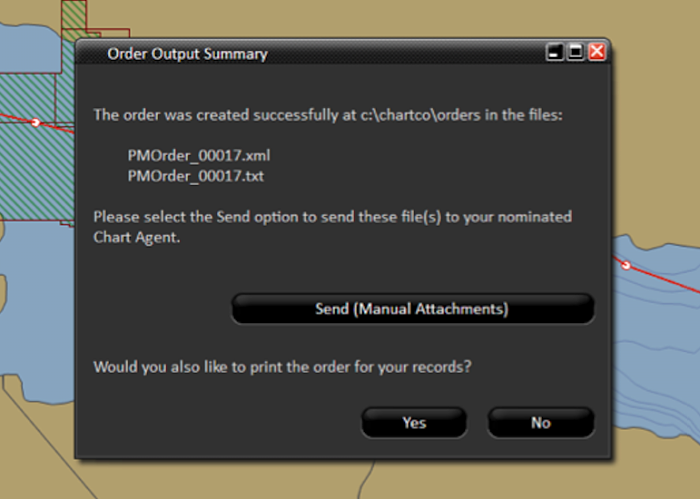
And then You will see an option of “Create order” at the bottom. Click on that. Follow the messages on the screen and create order. Finally you will see the below screen, which will give you the files to send to the chart provider.
Sending the order and receiving the cell permits
After you locate the order as per the message in above screen, you need to send these files to your chart provider. It all depends upon your company, if you can send the request directly or you need to send it to your company.
Within a day, the chart provider will send the permit as an attachment for the ENCs you requested. The email and zipped attachment would look something like below.
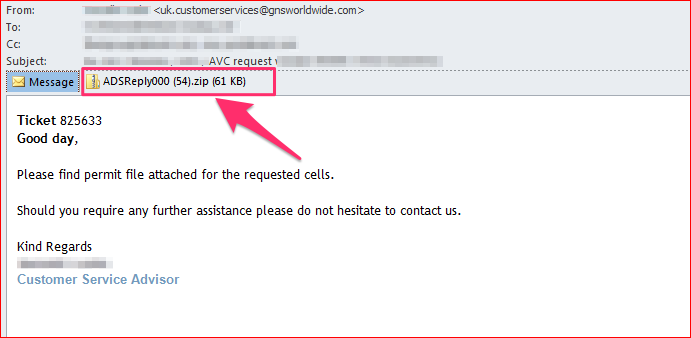
If you open this zipped attachment and then open permit folder located in this, you will find the files which need to be imported in the ECDIS. If you have two ECDIS and you had requested ENC for both, you will see two folder inside permit folder. These folder will be “MASTER” and “BACKUP”. You need to copy and import the files into corresponding ECDIS one by one. That is if you copy files from “Master” folder, you need to import these files in Master ECDIS. Then delete the files from the USB Drive and do same for Backup ECDIS.
Importing Cell permits into ECDIS
After you copy the cell permit in USB Drive, go to Application window on JRC ECDIS. Application window is displayed automatically when ECDIS is switched on. Otherwise you can access the application window by clicking exit on the top menu.
In the application Window, click on the “ENC and ARCS chart portfolio”. Plug in the USB drive containing the cell permits.
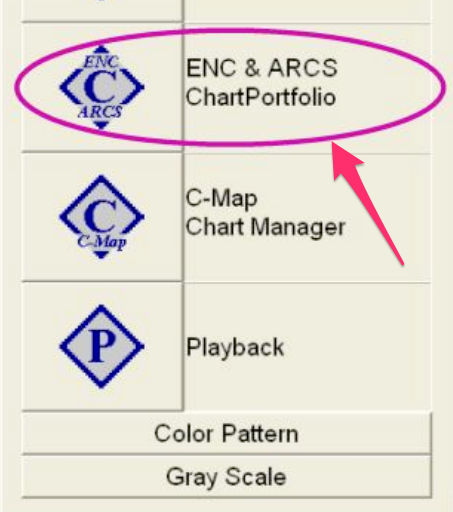
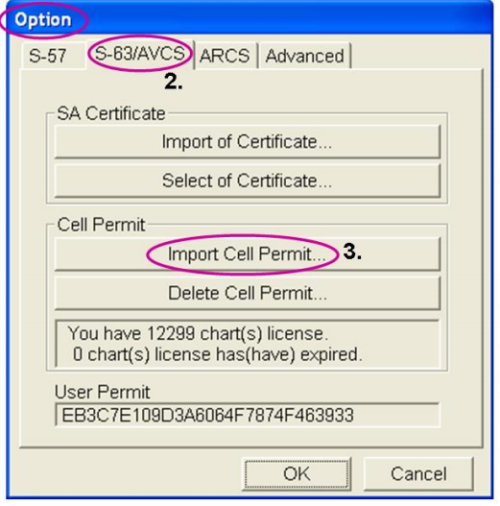
In the application Window, click on the “ENC and ARCS chart portfolio”. Go to Tools –> Options –> S63/AVCS and click on import cell permit. In the find file window that would be displayed, point to USB drive and select Permit.txt file and click OK.
After importing the cell permits, you will get a window displaying “Completed” message. After importing the cell permit, The ENC of the desired voyage would be available in the ECDIS.
2. Chart Correction on ECDIS
Again for chart correction, we should go with same approach and ask same questions. Do we know how on ECDIS all the corrections are done that we do on paper charts ? As we all know, there are two type of corrections we do on paper charts
- Permanent correction
- Temporary & preliminary (T&P) corrections
Do you know how to correct your charts on ECDIS (ENCs) for these corrections. If you know, well you have covered the correction part too.
Just in case you don’t know, with Chartco and JRC ECDIS lets see how it is done.
Permanent corrections
Correcting ENCs for permanent corrections is a three step process which is
- Collect corrections from chartco
- apply corrections to ENCs on ECDIS
- Confirm corrections applied on Chartco
Collect corrections from chartco
From start up-Menu (on the left bottom section in chartco), click on Corrections. Click on ENC (top bar) and corrections (Right side bar). This list will show you the pending corrections to your active cells.
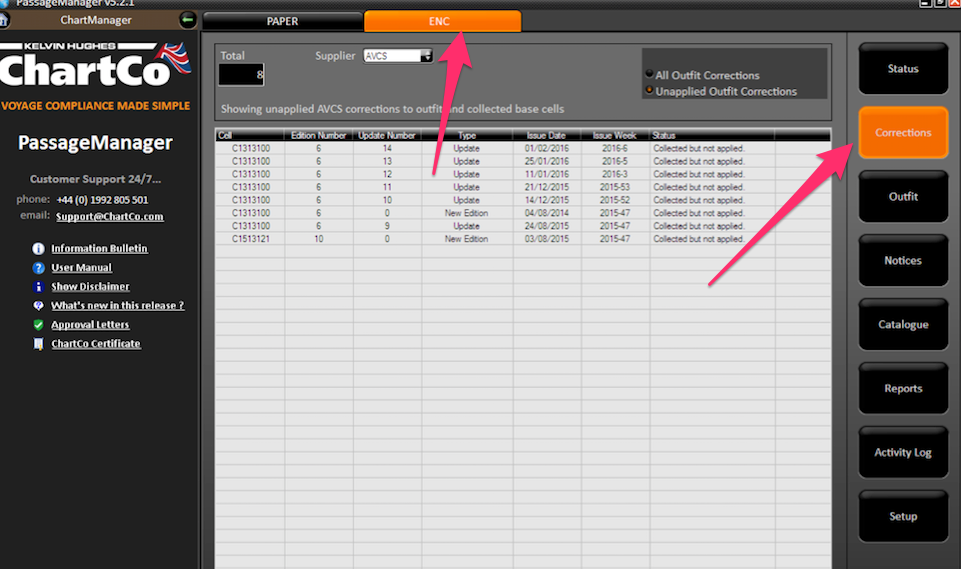
Click on the “Collect and transfer to ECDIS” at the bottom of the screen. On the pop up, ensure that both Master as well as Back up is selected and then click on “Write to Media”.
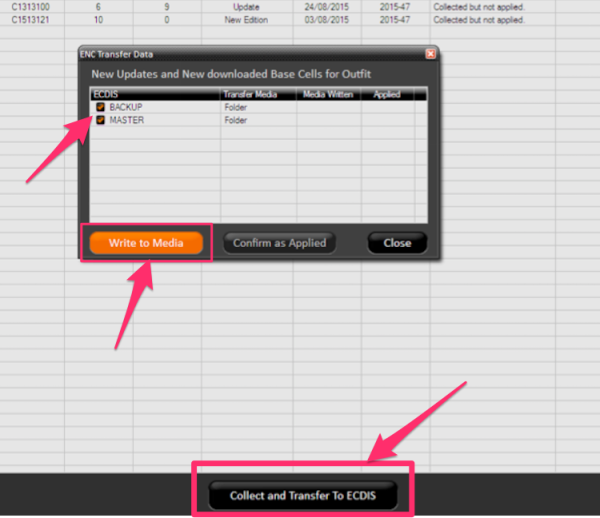
This will write all the corrections in a pre-specified folder. This folder is usually located in C:/Chartco/Corrections but could be specified differently during chartco set up. In any case, on clicking the ‘Write to media” chartco will give the destination of the folder where corrections are transferred.
If you see in above image there is an option of “Confirm as applied”. After you have applied to the correction to ENCs on ECDIS, which we will discuss below, you need to come to this screen again and click “Confirm as applied”.
To apply these corrections to ECDIS, Copy these corrections onto USB drive (or CD). Again if you have two ECDIS you will see different folder for both ECDIS named Master and back up. You need to copy content of one folder at a time and apply the corrections to the corresponding ECDIS.
Applying corrections to ENCs on ECDIS
In the application Window, click on the “ENC and ARCS chart portfolio”. Plug in the USB drive containing the corrections. Click Auto Detect. With this You will see all the pending corrections. On clicking Auto detect you may get a message “Please select media type”. In this case go to tools -> options -> Advanced options and then select the location of USB drive (or CD drive) depending upon the media on which you have copied the corrections. Then again click the Auto detect tab. This will show you the corrections.
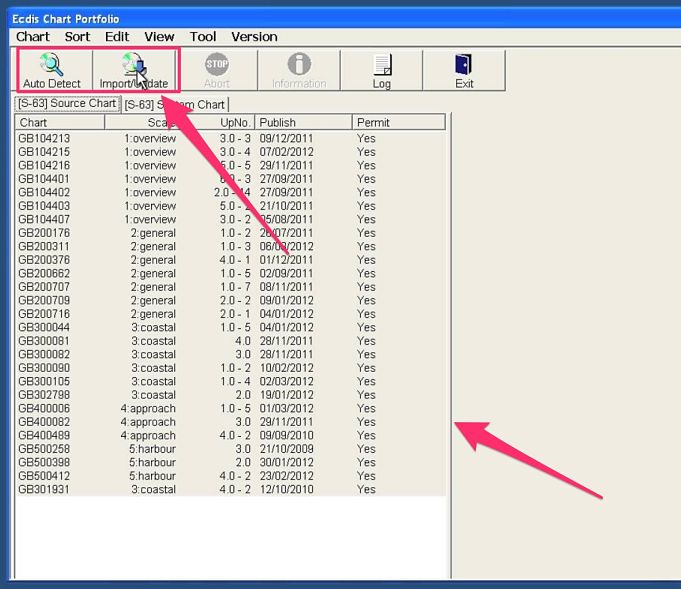
Now to apply the corrections, click on the “Import/Update” tab. This will apply all the permanent corrections to ENCs on your ECDIS. You need to repeat this procedure on other ECDIS. But for that you need to delete the data from the USB Drive and copy the data from the corresponding folder of chartco.
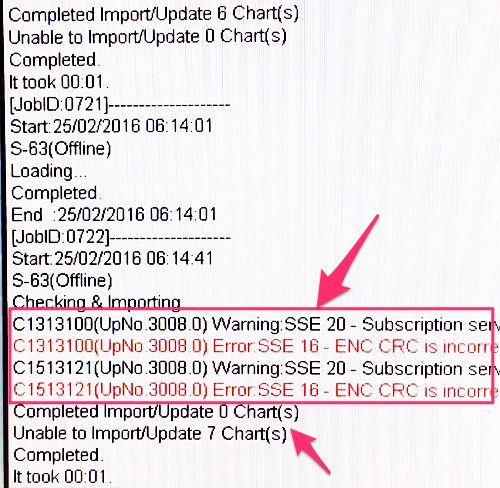
After applying the corrections, you need to click on log to see if there was any error while importing the corrections. Or if all the corrections were imported into the ECDIS.
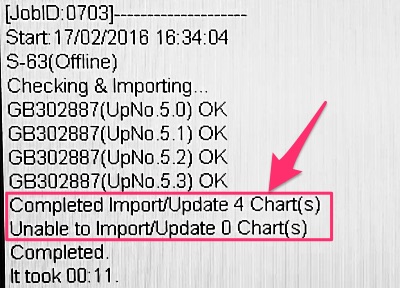
Any error in the log must be dealt with. In dealing with any error, you must exploit the tons of resources available to you. These resources can be support from chartco, chart provider, ECDIS manual, UKHO website or your company’s marine department.
Confirm corrections applied on Chartco
After you have applied these correction, you need to go to Chartco and click on “Confirm as applied” as discussed earlier in this post.
It is important that you collect the correction, apply the corrections to ECDIS and confirm same in Chartco within few minutes of one another. This will ensure that when you confirm in chartco of the correction applied, you do not inadvertently confirm the new correction received which were not actually collected and applied.
Correction of ENCs with AVCS CDs
Apart from getting corrections from Chartco or digitrace every week, you will also get AVCS CDs or DVDs (or both) from your chart supplier. If you receive only CDs, you would most likely have 9 Base CDs and one or two update CDs. If you receive only DVDs, you would most likely have two DVDs. DVDs contains all the base cells as well as the update for those base cells. There is no different DVD for base cells.
If your ECDIS has only CD drive, off course you only can use CDs for correction. But if your ECDIS have DVD drive, you can use either CD set or DVD sets for corrections but not both.
If using CDs you need to insert first base cells CD starting from base cell 1 and so on. After updating the base cells, you need to insert the updates CD to update the corrections.
These corrections are cumulative. That mean if you have two sets one for week 04/2016 and other for week 07/2016. In this case you only need to update with the latest one only.
But why do we need to update these DVDs if we are correcting our ENCs through weekly corrections from Chartco or Digitrace.
There are two reasons. First base cells needs to be updated continuously. These updates are heavy and cannot get in entirety from chartco, though we can download the base cell for a particular ENC if required. This off course would be only possible if your Chartco computer has direct access to internet.
Second reason for using these CD or DVD for correction is as a reset point for the correction. Your ECDIS may have skipped importing some corrections for any reason. As we already discussed you will get the error in the ECDIS log but nonetheless there can be some cells which refuse to accept corrections.
Moreover you or previous staff might have inadvertently confirm some corrections as applied in Chartco which were not actually applied. Updates from these CDs or DVDs acts as a reset point for all the corrections.
Procedure of applying the correction from AVCS CD/DVD is same as with USB drive. After the corrections are applied, you need to tell chartco also about the updates.
For this, insert the CD or DVD in chartco computer. Then on the Home page of chartco, go to ENC and then click set up. Under “ENC Suppliers” click on “Set” for AVCS and follow the screen messages to confirm that you applied the latest CD/DVD on your ECDIS.
Temporary & preliminary (T&P) corrections
If you don’t already know, you will be surprised that for many ENCs you still need to do T&P corrections manually. Displaying T&P corrections on ECDIS was a challenge for UKHO and they managed this with AIO. AIO refer to Admiralty Information overlay. In simple terms, it is an ENC layer which contains T&P corrections of all the charts (ENCs). This layer is super imposed on the ENCs to display the T&Ps.
Irony is, that not all countries has yet mirrored their T&P correction in ENCs. So for the countries that do not issue ENC T&Ps in AIO, you need to plot the T&Ps manually on the ENCs issued by these countries. To know which countries issue or do not issue the T&Ps for ENC as AIO, you can click here.
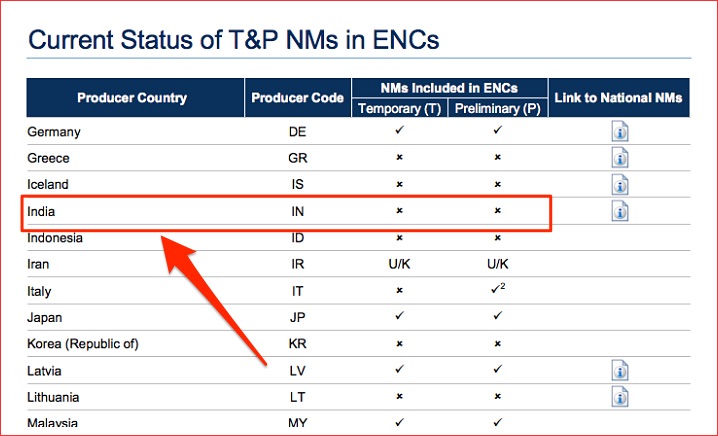
If you see the list, India does not issue T&Ps for ENCs. So for any ENC issued by Indian Hydrographic office, you need to plot the T&Ps manually from paper T&Ps. Which country has issued a particular ENC can be identified by two prefixed letters of the ENC number. For example the ENC number of the ENC issued by India would start with letters IN.
Even if a country issues the T&Ps for ENCs, To display the AIO and thus to display these T&Ps on ECDIS, ensure following
1) Check if your ECDIS is capable / Compatible to show AIO
To check, go to AVCS in UKHO website and click on “ECDIS & AIO”.
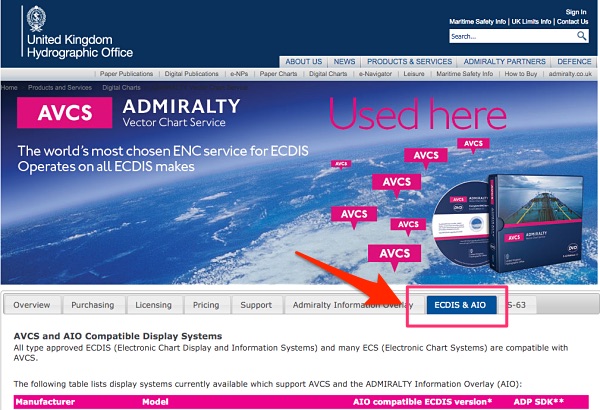
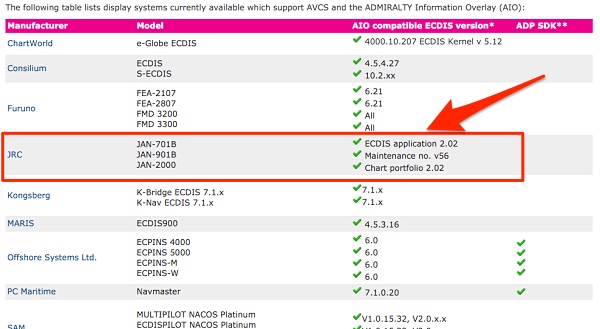
Check if Make / Model / Version of your ECDIS appears there. If it does, your ECDIS is compatible to show AIO.
2) AIO data must have been loaded into the ECDIS
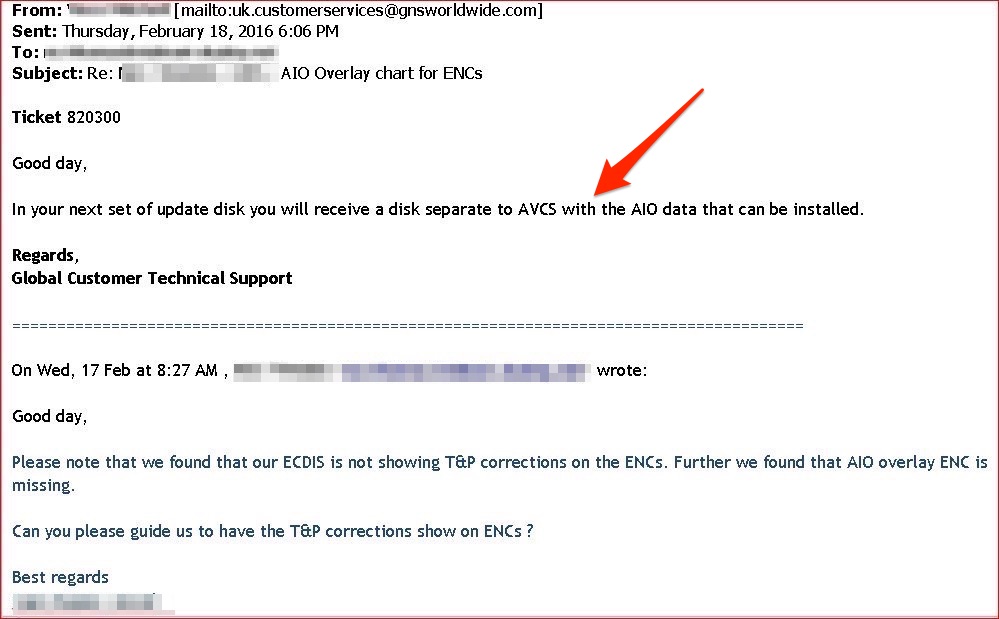
To check this on JRC ECIDS, exit the navigation window and go to application window. click on the “ENC and ARCS chart portfolio”. From top menu go to Sort -> AIO. Look in AIO Source charts and system charts, if any cells are available. If not, then the ECDIS has not been loaded with initial AIO data. Again you need to exploit the resources, in this case your chart provider. See below communication for example.
3) Your correction software/provider must be set up to provide you AIO data every week
On chartco, you can check if AIO information is being provided in the weekly corrections. To check this, on the Home page go to ENC and then click set up. Under “ENC Suppliers” check if AVCS (AIO) is set up.
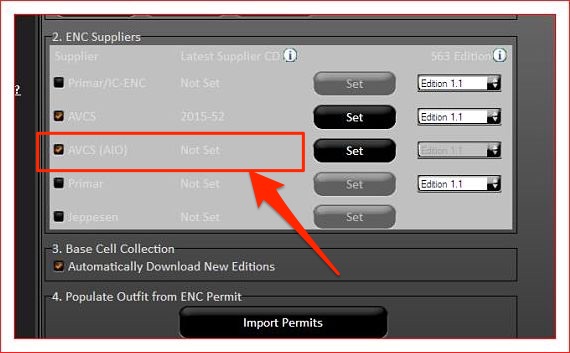
If it is not set up, you need to do so with the CD received from the ENC supplier.
Base cells: What are these
So we now know how to order, receive and correct our ENC. But sometimes when you import the chart permit or correction, you may get an error saying,
“Please update the base cell for ENC …”
To understand why you can get this, lets first discuss what are base cells.
In simple words base cells are the actual electronic charts (ENCs). When we receive permit for ENCs, the permit contains key to open ENCs (base cell) which are locked. But the ENCs are already there in your ECDIS as base cells. A base cell becomes an ENC when some security features (IHO system key) are added to it. And that is the main difference too.
Updates to Base cells
Again lets understand this by comparing ENCs with paper charts. Paper charts gets new editions. Similarly ENCs can get new editions where old ENCs are repleced by same ENCs but with new editions.
Also as we sometimes get new paper charts, there can be new ENCs which are produced. How do we get these new ENCs or new edition of ENCs.
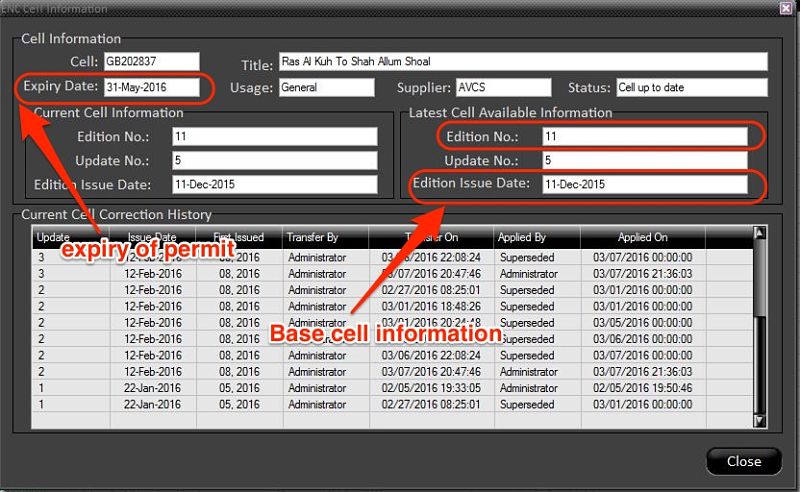
We get these from the updates to base cells. We can get the updates via CDs or DVDs.
We need to apply these base CDs to the ECDIS to update the base cells to the latest one.
Do we need to apply the base cell CD each time a new permit is received ?
Absolutely not. If you were able to import a permit successfully, you do not need to apply base CD again. Similar is the case while applying the weekly updates from the chartco.
But sometime, while importing a permit you may receive an error saying
“Please update the base cell for ENC …”
In this case, run latest base CDs or the base DVD even if you had previously run it on receipt. Try to import the permit again. If you still cannot import the permit, you can get this particular base cell from the chartco. To get this from chartco, from the start menu click on chart manager or from home page click on ENC.
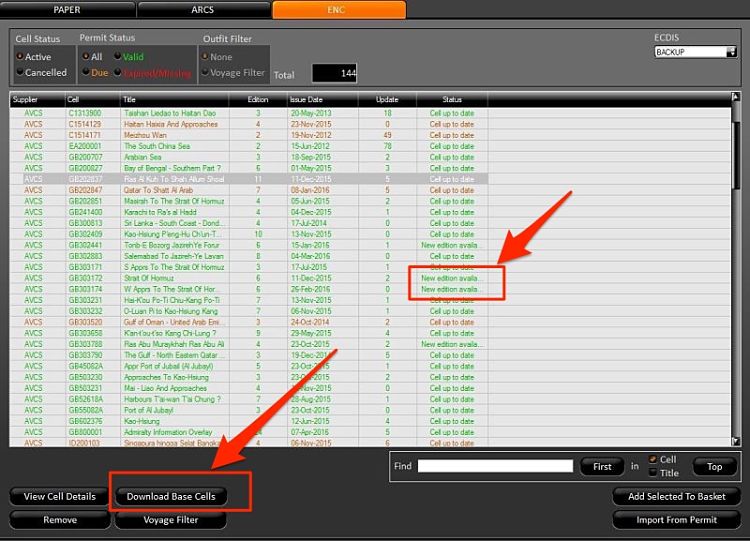
You can choose the cell required and click on “Download Base Cells”. Next import from the charts, you will receive the base cell.
Alternatively in the chartco you can set the automatic downloads of the new base cells. This can be done by going to the SET UP section of ENC in chartco.
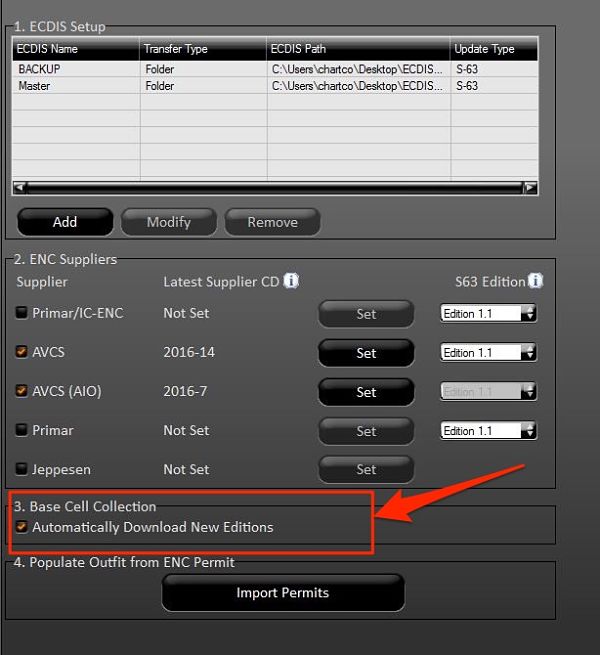
Even when you download the base cells from the chartco, we need to run the base cell CDs or DVD in the ECDIS. This is because this acts as the reset point in case we have missed a base cell update.
Conclusion
Someone somewhere said, it is easier to find answers than finding questions. With regard to ECDIS, if we know our questions, the answers just need you finding it. In order to find what we are looking in ECDIS, the approach of comparing it with procedures adopted for paper charts could be the best approach.
For example our approach to enable us to perform each activity of paper chart like permanent and T&P correction on ECDIS can leave less areas unexplored.
With ECDIS already mandatory on many ships, it is the time that we understand every aspect of implementation of ECDIS onboard.